DMU selection
By default all units entered or read in from an input file are selected in the sense that they will all be assessed. You may however, for some of your DEA models wish to use only a subset of the full set of units initially entered. You can do this by using the 'DMU' window illustrated below.
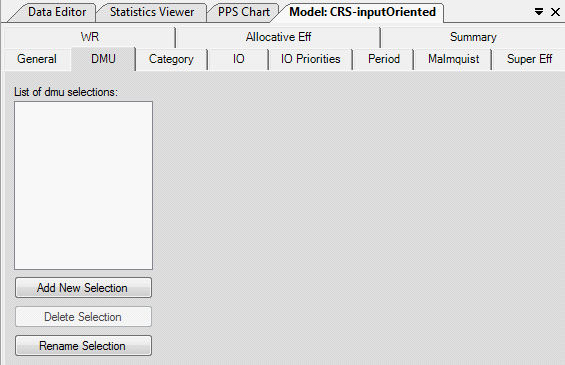
You first need to click the  icon. This will automatically create a selection in the 'List of DMU selections' area giving it a default name ‘selection 1’. You can also easily delete a selection list you have created by using the
  icon.
icon.
icon. This will automatically create a selection in the 'List of DMU selections' area giving it a default name ‘selection 1’. You can also easily delete a selection list you have created by using the icon.
It is good practice to rename your chosen selection so that you can easily make a connection as to the particular subset of DMUs within the selection. Use the  icon for this.
icon for this.
The next stage is to actually add your chosen DMUs to the selection you have just created. To do this you will need to single click your named selection making the following page show on the screen:
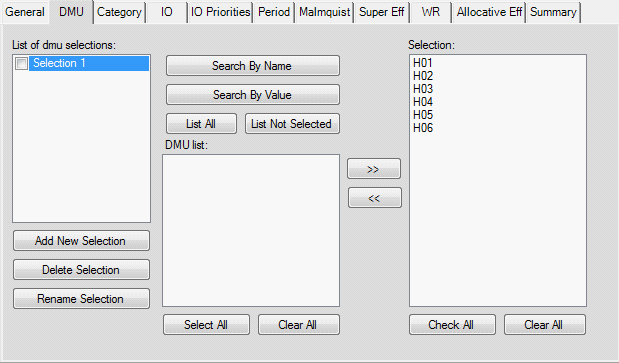
The selection list is to be created on the right panel, headed ‘Selection’. To choose a DMU to move out of the selection list you will need to highlight the chosen DMU with a single click and use  to move it from the right side to the left. Alternatively if you have have changed your mind you can use
  to move the DMU back into the 'Selection' column.
to move it from the right side to the left. Alternatively if you have have changed your mind you can use to move the DMU back into the 'Selection' column.
If you wish to highlight all of your DMUs in order to move them from one of the columns you can use the  to select from the 'Selection' column or the
  icon to select all DMUs within the 'DMU list'. You can then once again use the arrow icons to shift all the DMUs from one column to the other.
to select from the 'Selection' column or the icon to select all DMUs within the 'DMU list'. You can then once again use the arrow icons to shift all the DMUs from one column to the other.
Once you have decided upon your selection and renamed you list, a similar page to the screen shot below will be shown.
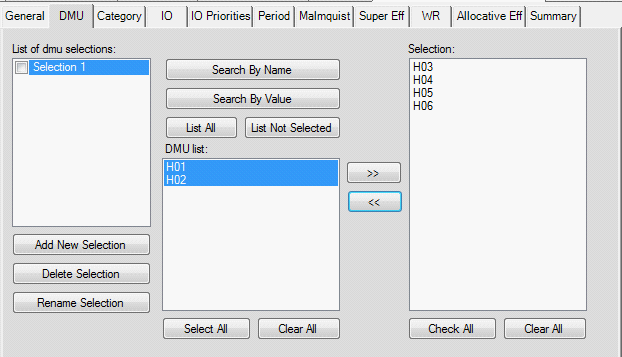
If you keep your chosen selection ticked, the PIM DEASoft-V3 software will automatically only assess the DMUs within the selection for your model, that is hospitals H3 to H6 in the illustration above. That is the selection list divides the global set of DMUs into two subsets, one ‘selected’ on the right panel and one ‘not selected’ in the left panel. (In the left panel one can list all DMUs too or simply those not selected. The assessment with a ticked list assesses only the DMUs in the selected, right panel.)
You can create a selection list also by searching for and selecting individual DMUs or ranges of DMUs in two additional ways.
Begin by creating a New Selection List name and highlighting it. Then clear the right panel and in the left panel click the  icon to list the global set of DMUs. You can now search this set in one of two ways:
icon to list the global set of DMUs. You can now search this set in one of two ways:
a) Search by Name
This will bring up the following window, allowing you to search for
- single or multiple DMUs;
- simple wildcard search: use * as any string with unknown length and ? for a single character;
- Regular Expression; Define appropriate regular expression that matches the DMUs
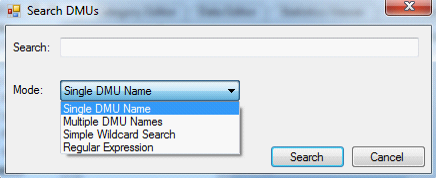
Select one of the four methods and enter suitable search criteria for that method. E.g. A* to search under ‘multiple DMU Names’ for all DMUs beginning with A. The software will automatically remove the DMU(s) not matching the search criteria and only leave on the left panel the DMU(s) matching the search criteria. Move these DMUs (or a subset thereof) to the right panel and the DMUs in the right panel will represent the selected DMUs for the selection list concerned. This method of creating a selection list is especially useful when you are using a large dataset and it is hard to select visually the DMU(s) you wish to use or omit.
b) Search by Value
If you choose to select your DMU(s) this way window like the following will appear.
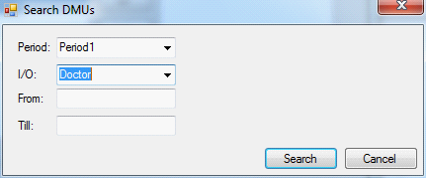
This allows you to search for DMUs by specifying a range of values on a particular input or output variable within a given period. List all DMUs in the left panel first and then specify the search criteria by value as indicated above. Once the DMUs meeting the search criteria are left on the left panel move them (or a subset thereof) to the right panel to make them the selected DMUs for the list concerned.
Once you are happy with your selection lists click on  to ensure your model changes are saved.
to ensure your model changes are saved.